

DreamHost is my favorite hosting service (and the one I use for my websites) because it is beginner-friendly, has straightforward pricing, and is affordable.
If you want a website to showcase your business, hosting your own WordPress website is the best way to have the most control. It’s also the most economical way to have a website.
There are several different hosting plans with DreamHost. But as an independent professional looking to build an online presence for your clients to find, get to know, and stay in touch with you, I recommend only two affordable options. That brings me to:
Step 1: Choose a plan
I suggest you choose between the shared starter and the shared unlimited.
Both the shared starter and the shared unlimited plans offer one free domain, unlimited traffic to your site, a WordPress installer, an AI website builder, a free SSL certificate (security), and a 97-day money-back guarantee.
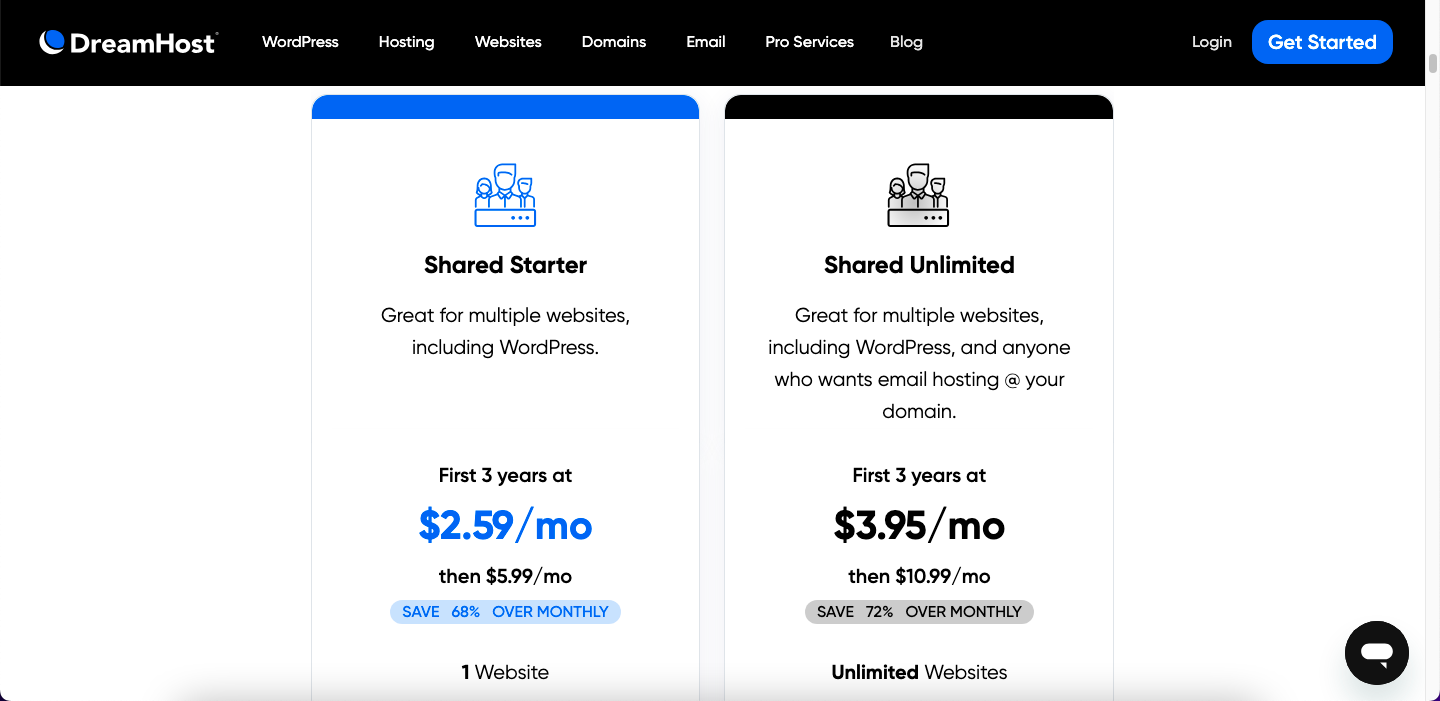
The Shared Starter Plan
The shared starter plan is DreamHost’s most affordable plan. To get the very most out of the most economical plan, you can pay for three years upfront, which comes to $2.59 per month ($93.24 paid in full, covering the first three years). Then, it costs $5.99 per month once the three years end ($215.64 paid in full at the start of the second three-year period).
If you sign up for just one year, you pay $2.95 monthly for the first year ($35.40 paid in full). After the initial year, the monthly price of $6.99 applies ($83.88 paid yearly).
The downside of the shared starter plan is that you can only have one domain (free for the first year) and one website. It also does not include a custom email (e.g., hi@yourdomain.com). To add email service, tag on an extra $20 per year.
The Shared Unlimited Plan
On the other hand, the shared unlimited plan costs $3.99 per month if you commit to three years ($142.20 introductory price). After that, the monthly cost is $10.99 ($395.64, paid in full at the beginning of each subsequent three-year period).
This plan’s one-year commitment price is $4.95 per month ($59.40 for the first year), which increases to $12.99 per month after the first year ($155.88 per year thereafter).
With the shared unlimited plan, you can host an unlimited number of domains and websites. You also get a free custom email, which you can either host through DreamHost or you can have emails sent to your @domain forwarded to your email account, such as Gmail.
How to choose?
If you know you only want one domain and one website (and won’t want to change it later), and you don’t really care about having a domain-specific email, like hello@caseycreates.com, then the shared starter is probably all you need.
However, if you want a couple of different domain names, even if only to point to the same website (for example, you want caseycreates.com and creativecasey.com), or if you want email hosting, you get unlimited email hosting @yourdomain with the shared unlimited plan. You also have the option to host an unlimited number of websites on this plan if you have multiple businesses.
Please note that only one domain is included free for the first year with any annual hosting package. Any additional domains or domain renewals will have a fee. However, I have noticed that DreamHost often offers discounts on new domain registrations.
Step 2: Check Out the DreamHost Site
Click here to open DreamHost.com in a new browser tab. Click on the “Get Started” button. This will bring you to a page with three hosting plan options: Shared, DreamPress, and VPS. Scroll down to the bottom of the “Shared” box. Just below the “Sign Up Now” button, there’s a link that says, “Learn More About Shared.”
After clicking the link, scroll down the page to compare the options between the shared starter and shared unlimited. You’ll also notice a no-commitment option, where you pay month-to-month and can cancel at any time for either plan. This option will not include a free domain for either of the shared plans I mentioned above.
Step 3: Sign Up for DreamHost
Once you have decided on the plan you want, click the “Sign Up Now” button. You’ll see a page with three options: Choose a domain later, Register a new domain, or I already have a domain. If you know what you want your domain to be, click “Register a new domain.”
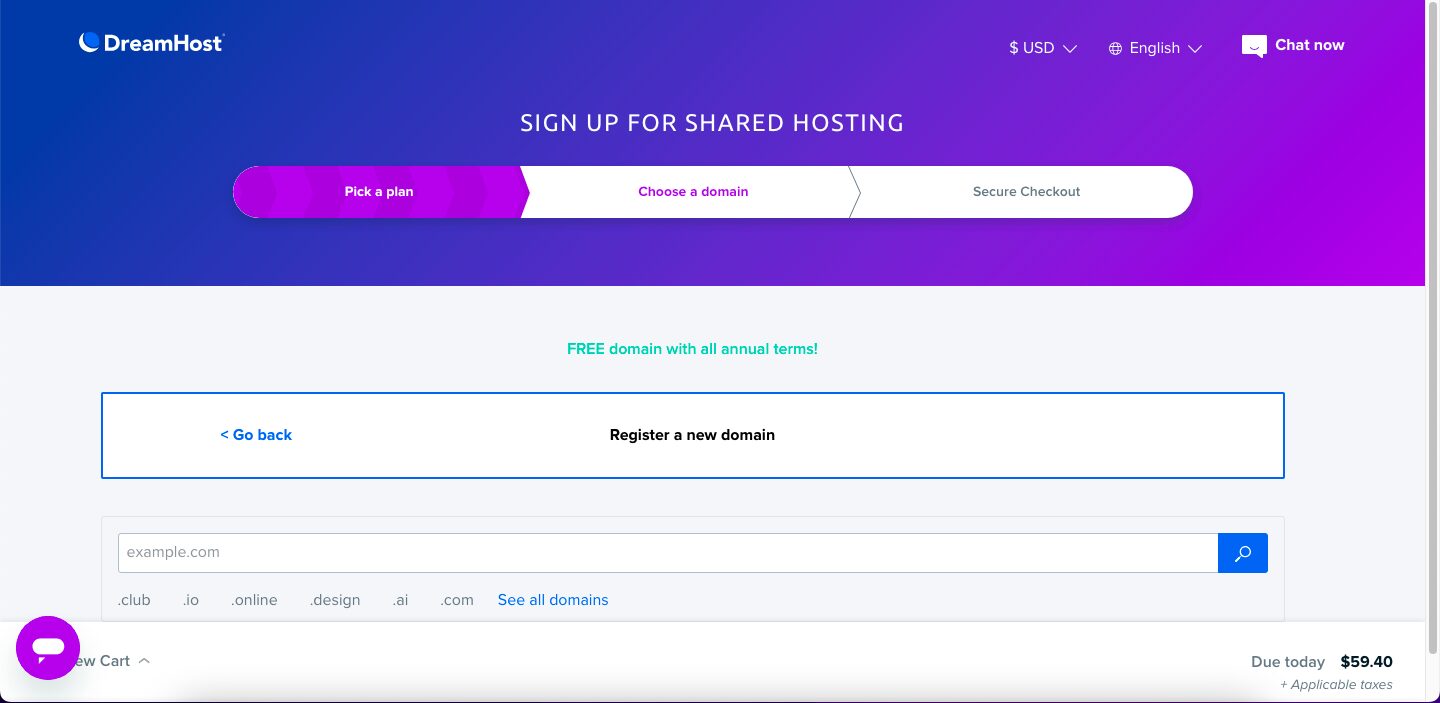
In the search box that pops up, type your desired domain and click the search icon. If your domain is available, then yay! You’ll move on to the next step. But it might say, “[yourdomain].com is already taken, but these domains are available!” You can choose one of the suggested open domains or keep trying different .com domain names until one you like is available.
I recommend trying to find a .com domain name because it’s what most people are used to, and you want it to be easy for your clients and potential clients to find you.
Once you find a suitable domain, click the “Add for $0.00” button (note that this won’t be a zero-dollar charge if you choose a monthly plan). This link will direct you to the secure checkout page, where you will enter your payment details and set up your account. Save your username and password in a safe location.
In the “Additional Options” box, you can uncheck the DreamShield protection option and ensure that the DreamHost SEO toolkit box is also unchecked. You can add these later if you decide you need them. You can also uncheck the box to opt out of receiving emails from DreamHost. Unless, of course, you like that kind of thing.
Submit your order, and you are officially set up to host a real, live website!
Now what?? Let your website developer know you’re ready to put your website up live! Or, if you’re building a site yourself, it’s time to install WordPress. 😉


0 Comments